How do you store your belts? In a drawer? In a closet? On your door?
Having suddenly found the urge to be more organized by hanging belts up somewhere without damaging the wall or smacking someone with the belts if I hung the belts off a door, it came upon me to revisit my closet. If I couldn’t hang my belts on the door, then a hanger in the closet would be the best option. What follows are some ideas for belt hangers, which you can also use for jewelry, ties, and maybe thin scarves. You can modify the hook sizes to work for hats too. Enjoy and feel free to make comments and suggestions on thoughts!

Materials Used
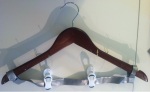
Take 1) Plastic Hanger and Ornament Hooks
Items: Ornament Hooks, Hanger with Rod, Tape/Glue (Optional, but would make this work better)
Steps: Hang hooks on hanger bar.

Plastic hanger with ornament clips
Results/Improvements: Because I didn’t glue or tape the hooks to make them stationary on the bar, the hooks kept sliding and sometimes, all the hooks and belts ended up on corner of the hanger, which meant I had a very lopsided hanger and the potential for tangling belts and hooks. In additional, it may help to have a wooden hanger instead since it will not easily bend as the plastic hanger did from the weight of the belts. Thus, I suggest you glue or tape the hooks if you pursue this option.
Alternative: Curved paper clips will probably work too instead of the ornament hangers. What matters is that you need to have a hook to hook onto the bar and another hook that curves upward to hold the belt.
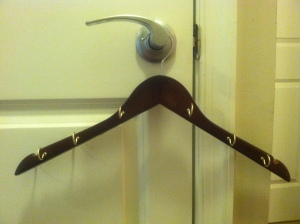
Take 2) The Wooden Diaries
Got an unused wooden hanger hanging around (har har …bad pun intended)? Make holes and shove in hooks, and voila! Belt hanger! I chose size 1’ for cup hooks and nails because that was the size that allowed me to screw the hooks all the way in without puncturing the other side of the particular hanger I used.
Tools Used as Substitutes:
– Screwdriver – Substitute for Hammer. Back of screwdriver used to smack nails into wood.
– Staple Remover – Substitute for nail remover. Better grip on the nail to pull it out of the wood.
– Nail– Substitute for Drill. You can just hammer a nail into wood to create a hole.
a. Wooden Hanger and Cup Hooks
Items: Wooden Hanger, Cup Hooks and Nails Size 1’, Drill(Optional), Nail (if you don’t have a drill to nail a hole for the cup hook to be screwed in), Hammer or something that you can use to smack the nail into the wood.
Steps (for no drill. If you have a drill, you can always use the drill to make the starting holes.):
1) Make holes in wood on Side 1 of hanger.
- Drill: Drill 1’ size holes into the wood. Do not drill too far. Drill just enough so you can fit a cup hook screw in so you can start screwing it in. You want to also space the holes far enough so that your belts fit and the belt buckles don’t overlap. Ideally, you want the holes to be symmetrical on the left and right side of the hanger so weight balances out more evenly.
- Nail: If you don’t have a drill, you can make the holes by hammering with one nail and reusing it. I used the back of a screwdriver to smack the nail into the wood. You should hammer at least the nail tip in and a little more. That will make sure you can start screwing the cup hooks in for the later step. You want to space the holes far enough so that your belts fit and the belt buckles don’t overlap. If you want to use the nail as the “hook” instead of the cup hook, you can leave the nails in, but make sure you nail them in further so they will hold the belts without falling out of the wood. If you are not using the nail as a hook, pull it out. If you have problems pulling the nail out, you can use a staple remover to help you get a better hold on the nail. Ideally, you want the holes to be symmetrical on the left and right side of the hanger so weight balances out more evenly.
2) Make holes with nails on Side 2. You will want these holes to be in between the holes you made on Side 1 because the hanger isn’t wide enough to hold two hooks/nails on the same location on opposite sides.

Straddle Hooks
If you are using nails as “hooks”, hammer them in further, then you are now done!
3) Next, if you are using cup hooks, just screw a hook into each hole, and voila, you’re done!
-
Wooden Hanger with Cup Hooks
Alternatives: If you want to save space in your closet, you can have the cup hooks under the hanger instead of on the sides of the hanger. Note that this option will not work with nails because the nail heads aren’t enough to anchor the belts in place. Also, your hooks will be screwed in sideways because the hanger is curved on the underside.
If you have the hangers with the wooden rods running underneath, that works too. However, you will have to find cup hooks that don’t screw all the way through. Those smaller hooks might not be large enough for belts. Also, the rods may also break easier. I did not use this option because the hangers I found had plastic sheaths on top of the wooden rod, which made it hard for me to hammer through.
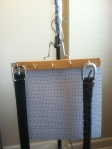
b. Wooden Hanger, Cup Hooks, Duct Tape, Clips
One of my coworkers requested a belt hanger with clips to hold belts that did not have buckles to hook. He requested that the clips not clip too tight because he did not want marks on the belt. Here’s what I came up with. Unfortunately, the materials I used don’t make it look professional. Haha.
Anyway, the basic concept is similar to the idea of suit hangers such as this one
-

Suit Hanger
The problem with many of these suit hanger clips is that they pinch too tightly. This is fine in clothes, but not for belt unless you want dents or holes in them.
Steps
1) The first part is to set up the “clip bar”, which will be below the hanger. Note that there are two dents in top of the hanger that I used. Cut a piece of duct tape that can span the distance between the two dents in the hanger. Fold the duct tape in half so it sticks to itself.
2) Cut two shorter pieces of duct tape, which you will want to use to hang the longer piece of tape. These two shorter pieces will each loop around the hanger dents and then attach to the longer piece of duct tape. Keep in mind you want the pieces long enough so that when you clip the clips onto the longer duct tape, they won’t hit the hanger.
3) Fold the center of one of the shorter pieces in half. Put that center in one of the hanger dents. So now…you potentially have 4 stick sides. Stick them on one end of the longer piece of duct tape. Then stick the other two sides around/on top of the pair you already stuck on. Repeat on the other end of the longer piece of duct tape with the other remaining short piece.
4) Follow the steps above for the wooden hanger and cup hooks. Do not use the version where the hooks hang below the hanger because they will interfere with the duct tape. Make the holes/hooks for the sides of the hanger.
5) Place clothesline clips or other soft grip clips that don’t grip too hard to the longer piece duct tape.


Result/Improvements: Aesthetically, duct tape probably isn’t the way to go, but it was the only thing I had available…though I did try to use an extra RJ45 cable I had lying around. I couldn’t bear to cut it though, so I didn’t use it. That said, wire, thick string, ribbon, rope all work in place of the duct tape. For those, you can string it across the two dent on the hanger and then put the clips on the wire/string/ribbon/rope. Alternatively, if you have a thin metal bar, you can always drill two holes in under side of the hanger and then glue/attach those bars. Just make sure the metal bar isn’t too thick for the clips and for the hanger. You can also make a wooden rectangular version, which will make it appear like the suit hanger. Find three dowels or three thin rectangular pieces of wood, one of the the pieces being the longer one to span the length between the other two dowels. Drill one hole each toward closer to the bottom of one side of each shorter piece. Glue/insert the longer piece sides into each of the shorter pieces’ holes. Then glue/insert the other ends of the short pieces into holes drilled in the underside of the hanger.
c. Pant Hanger, Cup Cooks
This is the same concept except with a pant/skirt hanger. I spaced my holes about 2 inches apart. I didn’t bother aligning them so some are higher than others. Ideally, you want the holes to be symmetrical on the left and right side of the hanger so weight balances out more evenly. My holes aren’t symmetric… see how one side has a hole closer to the edge than the other side?


The benefits of using a pant hanger is that you have the option of having the cup hooks coming out of other side of the coat hanger or can have two sets of cup hooks coming out under the pant hanger because there are two parts of the hanger as opposed to one for the coat hanger. If you want to put even more hooks in, you can have hooks both on the sides and on the bottoms of the pant hanger. However, just make sure that the side hooks and the bottom hooks are straddled otherwise when you screw the hooks in, the screw parts will collide and not screw in. Also, you will want to be mindful of the weight. I’m not sure what the hanger weight tolerance is.
Additionally, you can decorate by clipping something with the pant holder clip. Here, I just randomly clipped a piece of scrapbook paper in the middle.
 I would not suggest clipping belts between the two parts because the pressure squeeze the belts too much.
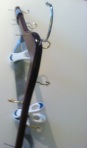
d. More Pictures – Added 8/10/2013
This belt hanger has hooks on one side and nails on the other along with the clips in the. Due to belt weight, I had to use some extra duct tape to keep the duct tape ribbon from sagging down due to weight. Alternatively, you can have a hook or nail stopping the duct tape ribbon from sliding on both sides.

Belt hanger – Hook Side. Added extra duct tape on the hanger to keep the duct tape portion in place when the belts hang off the clips.
Top View of Hook/Nail Belt Hanger
Nail Side of Belt Hanger


